And so the adventure begins. It would be hard to say where the idea of curing our own meats came from originally, but once it was there, it became an obsession that was never far from mind. There are so many appealing aspects to curing your own meat, from the self-sufficiency it affords, to the ability to create un-tasted and commercially non-viable delicacies, to the intellectual challenge of understanding and optimizing the chemistry behind what is going on.
There are many different styles of cured meats, from sausages made from ground meat to prosciuttos made from whole muscles. In addition, there is a wide range of materials and methods that are used: from caves in Tuscany, to refrigerators in New Jersey; from natural bacteria, to Bactoferm M-EK-4, it’s all been done (and if it hasn’t been done yet, you can bet that someone is thinking about trying it as we speak).
Due to our lack of a cave with low temperatures and high humidity, the first step in our journey was to create a curing chamber for our meat. The goal for a curing chamber is to create an environment that has the relatively cool temperatures of 50 F/10 C and the relatively high humidity of 70-80% RH. The best way for us to do this was to outfit an old fridge with all the necessary trappings.
We were able to find a used fridge on Craigslist that was suitable for our purposes, larger than a traditional dorm fridge, but smaller than a regular sized fridge, and lacking a freezer section meaning that we could use all the available space to hang our meat.
There are 4 important aspects you want to be able to control in your curing chamber; air flow, humidity, temperature, and power.
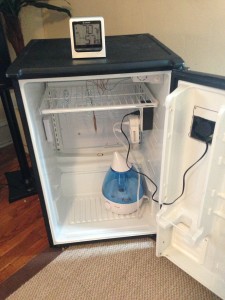
Air Flow: Achieved through inserting a computer fan into the fridge door. Air gets blown out from the fan, which is inserted at the top of the door. Air comes in through the bottom of the door, which has a dryer vent on the inside of the door to block backflow through the same vent. The bottom vent should be covered by wire mesh to prevent rodent/insect entry, while the computer fan should be covered with a dryer vent for the same purpose.
Humidity: Achieved through the use of a humidifier, attached to a hygrostat to regulate the humidity. The RH in a fridge is much lower than needed, so we added an ultrasonic humidifier that needs to be refilled about once every two weeks or so, depending on different factors.
Temperature:Achieved by inserting a temperature sensor into the fridge, and attaching that to an on/off switch for the fridge. The fridge will naturally run colder than the desired 50 F/10C that we want, so the temperature sensor will detect when the fridge is at the correct temperature and switch off power to the fridge.
Power: Power for the internal accessories achieved by mounting an outdoor power strip on the inside door-side side wall of the fridge.
Our finished product looked like this:
Resources:
Of course, we never would have even known where to begin with this construction without the help and guidance of other like-minded bloggers.
http://curedmeats.blogspot.mx/2007/07/key-equipment-piece-3-curing-chamber.html
http://benstarr.com/blog/how-to-convert-a-refrigerator-for-curing-meat-or-aging-cheese/
http://pickledpig.wordpress.com/2010/09/24/the-curing-chamber/
http://mattikaarts.com/blog/charcuterie/meat-curing-at-home-the-setup/
Disclaimer: All information stated on this website is for information purposes only. The information is not specific advice for any individual. The content of this website should not substitute electric/engineering/building advice from a professional. If you have a problem, speak to a professional immediately about the issue.
