The Explorations of a Gastrochemist

...because science can be delicious.

  • Beginner’s Guide
  • Wurst Adventure
  • Charcuterie
  • Preservation
  • Science
  • Molecular Gastronomy
  • All Projects
You are here: Home / Archives for AOG

Curing Chamber: Construction

April 1, 2014 by AOG 8 Comments

Construction day was finally upon us! After months of dreaming and planning and buying parts online, we were finally ready.


Step 1 (Air circulation):

Air circulation is vital for curing meats, so we decided to insert a computer fan into the top of the refrigerator door and a hole at the bottom, in order to generate air flow in the chamber. We removed the door of the refrigerator in order to better access what we needed. We measured the area that we needed to cut in order to saw the holes.

The hole at the top was cut for the size of the computer fan, and was square.

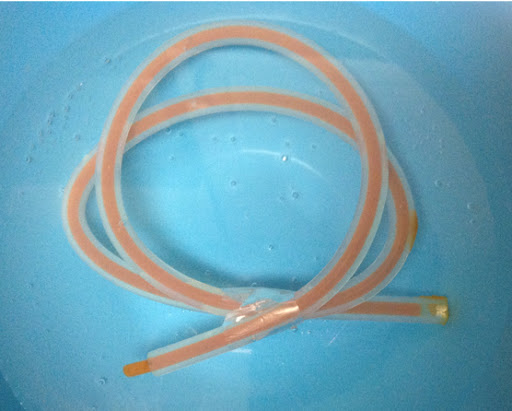
The hole at the bottom was circular, in order to insert a piece of PVC pipe into the air outflow hole.

After these holes were cut, the computer fan was inserted into the top square hole and the PVC pipe was inserted into the bottom round hole.

We then added wire mesh and dryer vents to both holes.

At this point, the door was done!


Step 2 (Power):

The next step was to add a power strip to the inside of the fridge. We drilled a hole for the power cord, and then glued an outdoor power box to the side of the fridge.

We screwed on the outer portion of the outlet and it was ready to supply power to the inside of the fridge! We were able to plug the computer fan into the outlet at this point.


Step 3 (Temperature):

The next thing we did was insert the temperature probe. This was done by drilling a small hole and feeding the probe wire through the hole. The probe wire was placed  roughly in the middle of the fridge, while the control box was adhered to the outside side of the fridge and plugged into an external power outlet. The probe wire senses the temperature and sends that information to the control box on the outside of the fridge, which has a control switch for you to control the set point. When the sensor reaches the set point, the fridge turns off/on in order to maintain the proper temperature.


Step 4 (Humidity):

The last step was to get the humidity right. We bought an ultrasonic humidifier that we filled with filtered water. We plugged it into the hygrostat which we then plugged into the outdoor power outlet on the inside of the fridge. The hygrostat monitors the humidity and turns the humidifier on/off as needed.

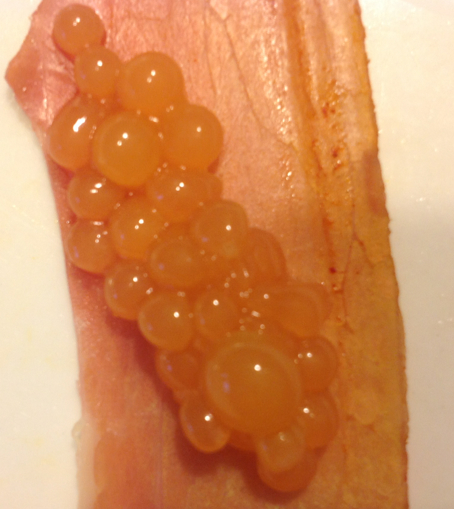
VOILA! And with that our curing chamber was all set up and ready for its first trial: Bresaola!


Resources:

And, again. Here are the sources that were so useful for our endeavors!

http://curedmeats.blogspot.mx/2007/07/key-equipment-piece-3-curing-chamber.html

http://benstarr.com/blog/how-to-convert-a-refrigerator-for-curing-meat-or-aging-cheese/

http://pickledpig.wordpress.com/2010/09/24/the-curing-chamber/

http://mattikaarts.com/blog/charcuterie/meat-curing-at-home-the-setup/


Disclaimer: All information stated on this website is for information purposes only. The information is not specific advice for any individual. The content of this website should not substitute electricity/engineering/building advice from a professional. If you have a problem, speak to a professional immediately about the issue.

Filed Under: Charcuterie Tagged With: charcuterie, cured meats, curing chamber, diy

Curing Chamber: Instructions

April 1, 2014 by AOG Leave a Comment

And so the adventure begins.  It would be hard to say where the idea of curing our own meats came from originally, but once it was there, it became an obsession that was never far from mind. There are so many appealing aspects to curing your own meat, from the self-sufficiency it affords, to the ability to create un-tasted and commercially non-viable delicacies, to the intellectual challenge of understanding and optimizing the chemistry behind what is going on.

There are many different styles of cured meats, from sausages made from ground meat to prosciuttos made from whole muscles. In addition, there is a wide range of materials and methods that are used: from caves in Tuscany, to refrigerators in New Jersey; from natural bacteria, to Bactoferm M-EK-4, it’s all been done (and if it hasn’t been done yet, you can bet that someone is thinking about trying it as we speak).

Due to our lack of a cave with low temperatures and high humidity, the first step in our journey was to create a curing chamber for our meat. The goal for a curing chamber is to create an environment that has the relatively cool temperatures of  50 F/10 C and the relatively high humidity of 70-80% RH. The best way for us to do this was to outfit an old fridge with all the necessary trappings.

We were able to find a used fridge on Craigslist that was suitable for our purposes, larger than a traditional dorm fridge, but smaller than a regular sized fridge, and lacking a freezer section meaning that we could use all the available space to hang our meat.


There are 4 important aspects you want to be able to control in your curing chamber; air flow, humidity, temperature, and power.

Air Flow: Achieved through inserting a computer fan into the fridge door. Air gets blown out from the fan, which is inserted at the top of the door. Air comes in through the bottom of the door, which has a dryer vent on the inside of the door to block backflow through the same vent. The bottom vent should be covered by wire mesh to prevent rodent/insect entry, while the computer fan should be covered with a dryer vent for the same purpose.

Humidity: Achieved through the use of a humidifier, attached to a hygrostat to regulate the humidity. The RH in a fridge is much lower than needed, so we added an ultrasonic humidifier that needs to be refilled about once every two weeks or so, depending on different factors.

Temperature:Achieved by inserting a temperature sensor into the fridge, and attaching that to an on/off switch for the fridge. The fridge will naturally run colder than the desired 50 F/10C that we want, so the temperature sensor will detect when the fridge is at the correct temperature and switch off power to the fridge.

Power: Power for the internal accessories achieved by mounting an outdoor power strip on the inside door-side side wall of the fridge.


Our finished product looked like this:


Resources:

Of course, we never would have even known where to begin with this construction without the help and guidance of other like-minded bloggers.

http://curedmeats.blogspot.mx/2007/07/key-equipment-piece-3-curing-chamber.html

http://benstarr.com/blog/how-to-convert-a-refrigerator-for-curing-meat-or-aging-cheese/

http://pickledpig.wordpress.com/2010/09/24/the-curing-chamber/

http://mattikaarts.com/blog/charcuterie/meat-curing-at-home-the-setup/


Disclaimer: All information stated on this website is for information purposes only. The information is not specific advice for any individual. The content of this website should not substitute electric/engineering/building advice from a professional. If you have a problem, speak to a professional immediately about the issue.

Filed Under: Charcuterie Tagged With: charcuterie, cured meats, curing chamber, diy

Perfect Mac and Cheese

May 27, 2013 by AOG 2 Comments

I was on a mission to create the perfect mac and cheese. Mac and cheese is a staple food, one that should be quick to make, and full of flavor. Unfortunately, many homemade cheese sauces leave much lacking. I have never been a fan of adding flour to a sauce, feeling that it gives a tasteless and unnaturally heavy quality to a dish. After going to a talk by Nathan Myhrvold and buying his book, Modernist Cuisine at Home, I was intrigued by his method and the science behind it.

Background

Basically, cheese sauces traditionally use cheese, butter, milk, and flour in order to create a heavy sauce.  This is done so that the cheese doesn’t separate out into its component parts. However, this method tends to make the sauce less flavorful and more clunky than smooth . Luckily, there is a solution.

Cheese has both water and oil components, which tend to separate, especially when heat is added. The solution to this is to add a component that can bind them together, and help to create an emulsion. One possibility for this is to use sodium citrate, which has components which can bind to both water and oil. This makes for a cheese sauce which is both strong and delicious.

Materials

2 grams sodium citrate (dissolved in about 100 grams  of water)

50 grams of grated cheese

Methods

First, heat up the 100 grams of water and dissolve the 2 grams of sodium citrate in the water. When the sodium citrate is all dissolved, add in the grated cheese slowly. When the cheese is all melted, use an immersion blender to create a smooth sauce.

iphone 12_23_12 3046

Finally, pour the sauce on to the awaiting boiled and drained pasta, and enjoy!


iphone 12_23_12 3052


Sources:

Science helps craft the perfect mac and cheese

Filed Under: Molecular Gastronomy

Powered Olive Oil

May 27, 2013 by AOG Leave a Comment

Making powder out of a liquid is one of the cooler things to see happen before your very eyes. One interesting way to do this is to use tapioca maltodextrin.

738px-Maltodextrin


Tapioca maltodextrin is a polysaccharide that consists of anywhere from 2 to 20 D-glucose linked together. It is a very lightweight power, with virtually no taste, and is used as a thickening agent in many different food items, including beer. Its unique structure allows it to microscopically encapsulate fat when it comes into contact with it. When this fat starts off as a liquid, a macroscopic transformation occurs, and the fat goes from a liquid to a powder.

Olive oil is a high fat content liquid that is fun to try this with. Olive oil powder can be sprinkled on salads or on tomatoes and mozzarella, or any dish that is improved with olive oil. The surprising taste when the power turns to liquid in your mouth is amazing!

Olive Oil Powdered-cropped

Sources

http://en.wikipedia.org/wiki/Maltodextrin

http://www.molecularrecipes.com/transformation/olive-oil-powder/


Filed Under: Molecular Gastronomy

The Trial and Error of Making Liquid Spherical Ravioli

January 7, 2013 by AOG Leave a Comment

As any scientist will tell you, experiments fail more than they succeed. In fact, if you just looked at the amount of time scientists spent on failed experiments compared to successful experiments, you might be tempted to conclude that the real task that scientists  are paid for is to fail. However, this failure is necessary. What leaps forward would we make by just repeating old experiments over and over again to prove we could? It’s in the taking of old experiments, analyzing the mechanism, and postulating the results with new compounds and setups that creates leaps forward.

I had done some reading about the making of liquid spherical pea ravioli (Molecular Recipes), but not being a large fan of peas, I decided to try and make some adjustments to the recipe. I wanted to make spherical spinach ravioli.

                                            Attempt 1:

As usual, I started by making the calcium lactate bath and storing it in the refrigerator. I then started with fresh baby spinach, and used the food processor to chop it up.

I ended with ~6 ounces of chopped spinach.

Using a mini blender, I mixed ~8 ounces of water with ~ 2 g of sodium alginate. I heated the water-sodium alginate mixture on the stove while stirring to create a clear viscous liquid.


I added the chopped spinach to this mixture and allowed it to simmer on the stove top for a while. When I removed it, I used the blender once more, and ended up with less  than 7 ounces.


The last step was to filter the mixture through a sieve.

This was when I realized I might have a problem. The liquid was too viscous to be easily strained with the strainer I own. After waiting about a half and hour and seeing no filtration occurring, I decided to hope for the best and go on to the next step.

Using the spoons that came in my Molecular Gastronomy kit, I went ahead and spooned out tablespoons of the spinach-sodium alginate mixture into the calcium bath. The results were less than ideal. Blobs that were mildly reminiscent of spheres formed, however they collapsed into a mushy runny liquid as soon as removed from the calcium bath.  Even when allowed to “cook” in the calcium bath for up to 15 minutes, this occurred.

So, my first experiment with liquid spherical ravioli failed. I had many factors to consider, and came up with a few things that I believe were factors in the failure. The most important of these were the viscosity and the pH.

As discussed previously, sodium alginate creates a gel upon contact with calcium (Ca2+). However, this only occurs with contact, so the outside of a sodium alginate droplet or sphere will create an alginate-Ca2+ gel matrix, while the inside, which is free from calcium contact, remains liquid (at least for a bit). This is the mechanism for how a liquid center sphere is created.

However, alginate only forms a gel with Ca2+ when it has a negatively charged oxygen atom free to bind with the positively charged Ca2+. This is the case when it is in the Na+ Alginate- form. However, when introduced to an environment where the pH is low (acidic), there is a preponderance of H+ around. This favors the reaction of sodium alginate –> alginic acid. Alginic acid not only doesn’t have a negative charge, allowing it to bond to the Ca2+, but it forms a solid itself. This means the solution will start to gel by itself. This can happen if you mix an acidic food with sodium alginate. (Note: you can also see premature gelling if the water used to create the sodium alginate mixture is tap water and not filtered due to calcium in the water supply.)   It is therefore important to monitor the pH of the foods used when using sodium alginate calcium mediated gelling.

There are many food pH charts available online where one can check the pH of the food they are using. After checking one, I learnt that spinach has a high (basic) pH. This is referred to as alkaline (Food pH Chart). It’s possible that being alkaline somehow affected solution and led to decreased gelling action, but not due to the above acidic-mediated disruption pathway. It is possible that perhaps the alkaline spinach bonded to the positive Ca2+ and disrupted the matrix of alginate-Ca2+ that usually forms. Without being sure of the exact mechanism, my suggested remedies to this problem would be to add an acidic compound that would even out the pH, using pH strips to test for the solution pH. The best solution would be to use an acidic compound that would also be complementary in flavor to the spinach.

The other issue, and in my mind probably the bigger issue, was the viscosity of the solution. The less viscous the alginate solution is, the greater the effect the liquid center has. In addition to this, viscosity can effect a reaction and the physical properties of  its product.

In this case, the fact that the spinach “soup” wouldn’t strain was probably a sign.  Although the desired viscosity for the solution/bath is more/less, there is such thing as too viscous. (10 Tips) Although I cannot be sure, I imagine the viscosity of the spinach-alginate solution as well as the lack of uniformity may have led to uneven alginate distribution, creating a dense sphere when in the bath that could not hold together out of it. To fix this issue, next time I would create a spinach soup that is blended to the point of being creamy, and with a higher water content in order to make it less viscous.

                                                 Attempt 2:

A few days later, I was thinking about my last failed experiment and feeling a little bummed out. I decided to try it again, this time using the tips I had troubleshooted from my last attempt. I still was opposed to using peas, but decided to try with edamame.

Using edamame would help both of the issues I had. Edamame is mildly alkaline compared to the more strongly alkaline spinach. In addition, blending peas tends to make a more uniform solution.

After making the calcium bath, I boiled the edamame for about 10-15 minutes. After they were soft, I took them out of the boiling water. Using an immersion blender, I blended them to create a uniform edamame blend.


Separately, I added 2 g of sodium alginate to 400 mL of water. Using an immersion blender, I combined the two. I then allowed it to heat on the stove top, until it became a clear solution.

 ———–> 

To this, I added the edamame and again combined them using an immersion blender to create an edamame-sodium alginate solution. The final step was to pass the solution through a sieve.

With everything ready, I got the calcium bath out of the refrigerator and began to try my second attempt at spherical liquid ravioli.

Yatta! The result was liquid spherical edamame ravioli. Although this attempt was also slightly viscous, the result was much more successful than attempt #1.

Resources:

Molecular Recipes: http://www.molecularrecipes.com/spherification/liquid-pea-ravioli/

Food pH Chart: http://www.greathealth247.com/ph-acid-alkaline-food-chart.html

10 Tips: http://www.molecularrecipes.com/spherification/10-tips-create-perfect-sphere/

Filed Under: Molecular Gastronomy

The Perfecting of the Piquant Pasta

January 7, 2013 by AOG Leave a Comment

My first attempt at making tomato-agar pasta went well, but I made a note of some of the things I wanted to change the next time around. The pasta broke easily, so increasing the % of agar was a must. I also didn’t end up with a large amount of pasta, and what I did end up with was very viscous (difficult to pick up in the syringe, leading to air bubbles and therefore breaks in the pasta strands), so I fixed this by adding water to the strained tomato soup. I also wanted to make the dish slightly more interesting, so I decided to create a dish of tomato-agar pasta combined with arugula-agar pasta.

I started with the arugula pasta this time. I was more laissez faire with the amounts this time around as I was getting more comfortable with eying up the necessary textures and consistencies.  I added handfuls of arugula and water to a blender, and blended them until they were as fine a paste as I could make them. I added salt to season the pasta, and ran the mixture through a sieve. I added 2g of agar to this fine mixture, heated it while stirring, and ended up with an arugula-agar mixture of 150 mL.
With 150 mL of the arugula-agar mixture, I was ready to go. The next step was to full up a syringe with the mixture, inject it into the PVC tubes, immerse them in cold water for ~3 minutes, and use an air-filled syringe to eject the noodles.

While I was doing this, I got the tomato-agar mixture ready. I did this by straining tomato soup, and adding water and agar to the mixture while heating.

I ended up with about 100 mL of the tomato-agar mixture, and began to make tomato-agar noodles when I was done with the arugula noodles.


I continued this until I had a plate full of arugula and tomato agar pasta. I grated fresh mozzarella and fresh pepper over the plate, and voila! An amazing plate of pasta consisting purely of tomato and arugula.

Filed Under: Molecular Gastronomy

Maillard Reactions

January 7, 2013 by AOG Leave a Comment

Maillard reactions are responsible for creating some of the most delicious flavors in cooking. Maillard reactions are referred to as “browning reactions”, as they are responsible for the taste of items such as toasted bread or seared steak. A Maillard reaction is a chemical reaction that occurs between what is referred to as a reducing sugar and an amino acid. An example of a reducing sugar is glucose. An amino acid can be found at the end of a peptide chain, in say meat. (Maillard Wikipedia)

This is illustrated well by many of the projects done by Breadventures_NJ (http://www.breadventuresnj.com/), such as the following pretzel puffs:

buns
The actual reaction occurs between the carbonyl of the reducing sugar and the amino group in the amino acid. It usually requires heat, but can be found to occur without heat in either high pressure or alkaline situations.  However, in most cases, such as in cooking a steak, the reaction will occur at 154 C or 310 F. For this reason, it is important when cooking a steak to keep moisture as low as possible, since having water in the reaction will keep the temperature at 100 C, and retard the rate of Maillard reactions. (Cooking for Geeks)

The amino group is nucleophilic, meaning that it is “nuclei-liking.” All this really means is that it is negatively charged, and will donate electrons to a more positively charged nucleus. Because of the way electrons are distributed in the carbonyl  group in the sugar, the oxygen has more of a negative charge, leaving the carbon with more of a positive charge. This means that the nucleophilic amino group will want to “attack” the more positive carbon atom in the carbonyl, which is the first step of a Maillard reaction. This reaction is more likely to occur in alkaline conditions because the amino group is more likely to be de-protonated, and therefore more negatively charged to begin with.

The amino-alcohol will undergo dehydration, and the result will be an N-substituted glycosylamine and water.

In the next step, the unstable glycosylamine will undergo what is known as an Amadori rearrangement. The result of this will be a ketosamine. (Wikipedia Amadori)

From this point, the ketose amine can react further to create a number of different endpoint products.

A schematic of the chemistry that goes on during all these steps is drawn out in the following figure. The reaction mechanism shown is for the reaction of alanine and glucose, and is simplified and condensed in places, but should give a good idea of what is actually going on during a Maillard reaction.
The reason that Maillard reactions impart such rich flavor to food is because there are a variety of sugars and amino acids that can combine to form different products. The result is an array of wonderfully rich flavors.

Resources:

Maillard Wikipedia: http://en.wikipedia.org/wiki/Maillard_reaction

Amadori Wikipedia: http://en.wikipedia.org/wiki/Amadori_rearrangement

Kitchen as Laboratory: The Kitchen as Laboratory: Reflections on the Science of Food and Cooking, Edited by Cesar Vega, Job Ubbink, and Erik van der Linden

Cooking for Geeks: http://www.cookingforgeeks.com/

On Food And Cooking: The Science and Lore of the Kitchen (Google eBook) by Harold McGee

Breadventures_NJ: http://www.breadventuresnj.com/

Filed Under: Science

Spherification of Melon

January 7, 2013 by AOG 4 Comments

Nothing is better than a delicious tapa. There are many different traditional tapas from different regions of Spain. If we look beyond Spain, we can find traditional food pairings from other cuisines, such as Italy. Cured meats paired with fruit is a dish found in many different cultures, for good reasons. It is delicious. One of the things I like best about molecular gastronomy is playing with traditional food pairings in new and unexpected ways.

In Italy, prosciutto e melone is a well known pairing. As a fan of the Spanish jamón serrano, I often keep some in stock. For this experiment, I decided to play with this pairing. I made spherical melon “caviar” served on jamón serrano as a tapa.


Background:

Science is the pursuit of knowledge that is approached from a systematic methodology that is ever questioning, criticizing, and incorporating. It takes theories based on facts that it came up with yesterday, dissects those decisions, and creates newer and more accurate theories. These theories will inevitably undergo the same evolution when tomorrow’s scientists realize what dunces we are today. However, it takes the semi-accurate discoveries and theories of the past to build upon the more right theories of today (Grobstein).

The scientific method can, and should, be applied gastronomy. It is not to say that food creations of the past are outdated, quite the opposite in fact. They are well established models for a reason. We are able to build upon what those before us have created, and create something new. This process is similar to Picasso studying the masters at the Prado, deconstructing their creations, and creating his own masterpieces. That is the goal of molecular gastronomy; to understand food at its core, to deconstruct it, and then create our own masterpieces that surprise and delight.

Picasso

There are both simple experimentations and more complex ones. One of the more complex and important experiments in gastronomy was the discovery that Chef Auguste Escoffier made with his use of chemistry (whether he knew it or not) to create veal stock using pan deglazing, and the subsequent introduction of umami to the western palate. (NPR)

A simple experimentation is the utilization of spherification to create foods with new texture compositions. However, it is not to be overlooked. It is one of the ways that molecular gastronomy can take traditional dishes and play with the textures and therefore tastes of the plate.

Spherification is a method that utilizes the chemistry of gelling agents. I’ve discussed agar-agar before, but this method uses sodium alginate. Sodium alginate is a gelling agent, which like agar, is extracted from seaweed. This method creates spherification via a calcium mediated gelling mechanism.

First, the sodium alginate is dissolved in a solution of what the spheres will be made out of. Then, a calcium bath is made by dissolving either calcium chloride or calcium lactate in water.  A syringe is loaded with the sodium alginate solution, and droplets are released into the calcium bath.

When the droplets make contact with the calcium bath, the outermost layer gels. This is due to calcium-mediated gelling. Calcium is a divalent ion that acts like a bridge between alginate chains. When the sodium alginate solution comes in contact with the calcium bath, the negative polymeric alginate chains are attracted to the positive calcium ions. They fit together in an “egg box configuration.” These polymer chains continue to form on the area that is in contact with the calcium bath until an outer layer gel has formed. The result is a gelled outer layer with a liquid center. (Kitchen as Laboratory)


Experiment:
The traditional dish I decided to play with was the pairing of cured meat with melon. Traditionally an Italian dish, prosciutto e melone, can be made just as well (if not better) with the Spanish cured ham, jamón Serrano.

Before I started with anything, I prepared the calcium bath that would be used later. To do this, I dissolved 5 g of calcium lactate in 500 g (18 oz) of water.  Once the calcium lactate is dissolved, this bath was put in the refrigerator to cool while the rest was being prepared.

The first step was to take a melon, and chop it into smaller pieces.

                       
These pieces were then put in a small blender and smoothed into a puree. The puree was passed through a strainer to create a fine melon juice, and measured at 8.5 Oz.
Then, 8 Oz (~150 g) of strained melon juice was added to 2 g sodium alginate and the mixture was blended until the sodium alginate was completely dissolved.

Then it was time to start! The calcium bath was removed from the fridge, and the syringe was filled with the melon-sodium alginate mixture.

Droplets were released from above the calcium bath and allowed to solidify for ~2 minutes in the bath.

                    
They were removed from the bath using a slotted spoon and gently rinsed with water to remove any traces of calcium.

Tasting:

The melon spheres were plated on top of delicious jamón Serrano, creating a delightful tapa of complementary flavors that literally explode in your mouth. This was a delightful play on the usual dish, and the perfect accompaniment to any meat and cheese platter. The spherification of fruit; definitely something you are going to want to try to complement any favorite cured meat or cheese.


Resources:

Grobstein: http://serendip.brynmawr.edu/local/grobstein.html

Picasso: http://en.wikipedia.org/wiki/Pablo_Picasso

Picasso Meninas: http://en.wikipedia.org/wiki/Las_Meninas_(Picasso)

Las Meninas: http://en.wikipedia.org/wiki/Las_Meninas

NPR: http://www.npr.org/templates/story/story.php?storyId=15819485

Molecular Recipes: http://www.molecularrecipes.com/spherification/melon-cantaloupe-caviar/

Kitchen as Laboratory: The Kitchen as Laboratory: Reflections on the Science of Food and Cooking, Edited by Cesar Vega, Job Ubbink, and Erik van der Linden

Filed Under: Molecular Gastronomy Tagged With: alginate, caviar, melon, melone, molecular gastronomy, prosciutto, spherification

Tomato-agar Spaghetti

January 7, 2013 by AOG Leave a Comment

It’s every kid’s favorite food. Why can’t it be every adult’s? With the use of agar, noodles don’t need to be the boring pasta we grew up with. Instead of just flour, noodles can be made with almost any conceivable food. Favorite food mushrooms? Spinach? Peas? Throw out the flour and grab a handful of your favorite food and some agar.

As demonstrated previously, tomatoes have been my favorite food. Therefore, I decided to start my experimentation with them. I liked the idea of taking traditional pasta and tomato sauce and cutting out the middle man.

To make tomato spaghetti, you need a couple items that most kitchens aren’t equipped with, a syringe and tight fitting PVC tubes.
The first step is to create a soup of what you want to make the pasta out of. Make it just as flavorful as you would make soup, and salt it slightly more than you normally would. I made tomato soup from fresh tomatoes, tomato paste, chicken broth, and a number of spices. I let it stay on medium heat for ~30 minutes. When it was ready to be served as soup, it was done.
The next step is to strain it. I discarded the chunky parts that were left in the strainer, so that only a fine tomato liquid was left. Then I measured 5.5 Oz (~150 g) of the filtered tomato soup. I placed in in a pan with 2.5 g of Agar. This was heated up to boiling and mixed thoroughly for 5-10 minutes.
When I was sure the agar was dissolved and uniformly distributed, I turned off the heat but allowed the pan to sit on the burner. If you remember from “Balsamic Vinegar Caviar” agar relaxes at higher temperatures, and begins to solidify and form a matrix at lower temperatures. This chemical process is what we are taking advantage of.
We begin by filling up the syringe with the hot tomato/agar soup. In this stage, the agar is relaxed and incorporated uniformly throughout the tomato soup. It should be a smooth liquid. The syringe is then attached to the end of a PVC tube. The PVC tubes can be curled around the fist for easier handling if desired.
When the entire PVC tube is filled with the hot tomato/agar soup, it is submerged in cold water. It is allowed to sit submerged for ~5 minutes or less, until it sets. This is the point where the agar is solidifying. Remember that at decreased temperatures, the agar forms double helix strands that then bind to other agar double helix strands, forming a matrix and trapping the other materials. This is how the tomato agar spaghetti is formed. What once was a hot tomato/agar soup has now become a cold matrix that have formed in the shape of the container they were in when the agar solidified, otherwise known as our tomato agar spaghetti.
                            
The last step is the hardest. Now that we have formed our spaghetti, we need to get them out of the tubes. The best way to do this is to fill up the syringe with either air or cold water, and push the spaghetti out of the tube. Be careful not to push too quickly, or the noodles may break.

And that’s it. Spaghetti made fun by the science of agar!
Resources:

http://www.molecularrecipes.com/gelification/tomato-agar-spaghetti/

http://www.molecularrecipes.com/gelification/agar-agar-spaghetti/

Filed Under: Molecular Gastronomy

Spherification to Create Balsamic Vinegar Caviar

January 7, 2013 by AOG Leave a Comment

A traditional italian appetizer is caprese, or tomato, mozzarella, and basil. There are many ways to make caprese, but the theme is generally the same. Why not have some fun with the dish?

The result of my experiment: Caprese with balsamic vinegar caviar.
What exactly is balsamic vinegar caviar, you might ask. Basically, balsamic vinegar in orbs that appear to the unknowing eye to look like caviar. The better question is, “What interesting chemistry is going on to create this?”

Vinegar is hydrophilic, meaning that it is made up of particles that are “water loving.” This is different from oil, which is hydrophobic, or “water hating.” Most people have seen this before when adding vinegar to olive oil. The two are immiscible, and will stay separate from each other.  The lowest energy way for a droplet of vinegar in olive oil to do this is to form a sphere.
On a similar note, many people are familiar with the phrase “micelle”. It is the spherical shape that forms when a molecule has both hydrophilic and hydrophobic parts. It is based on the fact that chemically, “like favors like.” The hydrophilic parts will arrange themselves on the outside of the micelle where they can interact with the hydrophilic solvent (aka water). This will shield the hydrophobic parts, which can then have favorable interactions in the center of the sphere. This can be seen in molecules which have both “water-liking” and “water-hating” parts, such as in detergents or soap.
Using this knowledge, we can approximate what is happening on a chemical level when we make balsamic vinegar caviar.

Vinegar is made of mostly water and acetic acid.


Olive oil on the other hand is made up of triglyceride esters.
When vinegar is dropped into olive oil, it tends to stay together. It does this (not consciously but because it is lower energy) to decease the surface area that it shares with olive oil, and thereby lowering the amount of unfavorable interactions and increasing the favorable ones.

All of this is simple kitchen chemistry. But it gets more interesting when you throw in Agar. Agar, or Agar-agar as it is also known, is a combination of agarose and agaropectin.
Agar has very interesting chemical properties, which is why it has been used historically as a gelling agent. One of the cooler aspects of agar, is that it exhibits hysteresis. As defined by Wikipedia, hysteresis is, “The dependence of a system not only on its current environment but also on its past environment. This dependence arises because the system can be in more than one internal state. To predict its future development, either its internal state or its history must be known.” (Wikipedia)

What this means for agar is that once it is set as a gel, it takes a much higher temperature to convert the gel back to a liquid. Agar will melt at 185°F / 85°C. It will begin to solidify in the range of 90–104°F / 32–40°C. When agar melts, it is in a higher energy state. This allows it to relax into a single stranded molecule. When it cools down, these single stranded start form double helix structures. The ends of the double helix structures will bind together, creating a mesh matrix of agar.  (Cooking for Geeks)

The agar allows for the spheres of vinegar that naturally form due to hydrophobic-hydrophilic interactions to solidify in this state. This creates a state of perpetual bliss, so to speak.

So, getting back to our balsamic vinegar caviar. To get prepared, a glass of olive oil should be put in the freezer for about 30 minutes. Then, the vinegar (around 100g/7 Oz)  needs to be heated up to boiling. The agar (2 g) is added. The solution is mixed and allowed to cool down to 50-55 ˚C/120-130 ˚F. Once the vinegar solution is cooled down to about 50 ˚C, we’re ready to go.

Take the cold glass of olive oil out. Fill up a syringe with the vinegar-agar solution. Slowly drop droplets of the vinegar-agar into the olive oil. Droplets should form and solidify. Collect them with a slotted spoon from the bottom of the glass, wash in water, and enjoy!
Sources:

Wikipedia: Acetic Acid, Agar, Triglyceride Esters, Olive oil and Vinegar, Hysteresis

Molecular Recipes: http://www.molecularrecipes.com/gelification/balsamic-vinegar-pearls/

Micelle Image: http://dma980.com/phpSitemapNG/micelle-phospholipid

Cooking for Geeks: http://static.cookingforgeeks.com/press/press-kits/cooking-for-geeks-p310-311-agar.pdf

Filed Under: Molecular Gastronomy

  • « Previous Page
  • 1
  • …
  • 4
  • 5
  • 6
  • 7
  • Next Page »
  • Instagram

Copyright © 2025 · Foodie Pro Theme by Shay Bocks · Built on the Genesis Framework · Powered by WordPress